
Diving is an exciting and adventurous sport, but as with any other active pursuit, safety is of utmost importance. One of the key aspects of safety is the proper care and maintenance of your diving equipment. To ensure maximum safety and longevity of your equipment, it is essential to follow the manufacturer's instructions and have repairs carried out only by an authorised diving centre. In this article, we will explain why these measures are so important and how they can affect your safety underwater.
Drysuit Glove Bonding Guide (SI TECH Systems)
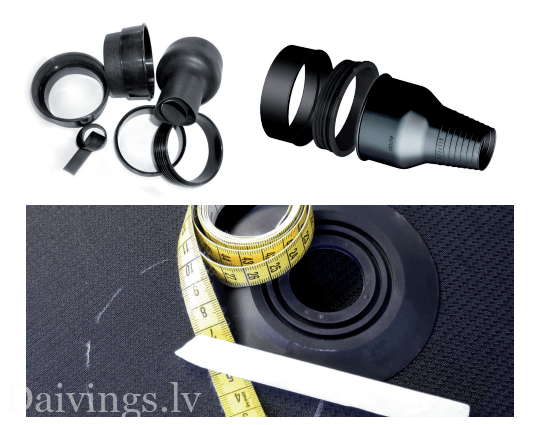
This tutorial provides detailed and precise information on how to properly glue elastic glove rings to the sleeves of a drysuit, SI TECH drysuit rings, ensuring a waterproof and secure connection.
Required materials:
- SI TECH drysuit rings (matching model for your suit):
- SLÄGGÖ Flex Ring
- QCS Oval
- Quick Cuff
- PU Ring
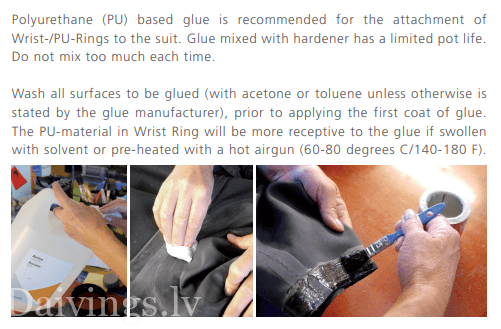
- Polyurethane (PU) based adhesive (SI TECH approved product recommended)
- Gloves (suitable for SI TECH rings)
- Degreaser (suitable for neoprene or silicone)
- Fine sandpaper (about 240-320 grit)
- Brush or applicator for applying glue
- Pressure roller or similar tool
- Marker
- Adhesive tape
- Ventilated room
Work process:
- Preparation:
- Make sure both the drysuit rings and gloves are clean and dry.
- Thoroughly clean the bonding surfaces on the rings and gloves with a degreaser.
- Lightly sand the abrasive surface of the sandpaper on the bonding areas on both the gloves and the rings.
- Labeling:
- Mark the bonding boundaries on the rings and gloves to ensure accurate positioning.
- Make sure the marks line up when the gloves are placed on the rings.
- Applying glue:
- Using a brush or applicator, apply a thin layer of glue evenly to both bonding surfaces (both rings and gloves).
- Make sure the glue is applied evenly and is not too thick.
- Connection:
- Allow the adhesive to dry for approximately 5-10 minutes or according to the manufacturer's instructions.
- Carefully connect the gloves to the rings, following the markings.
- Ensure there are no air bubbles or creases.
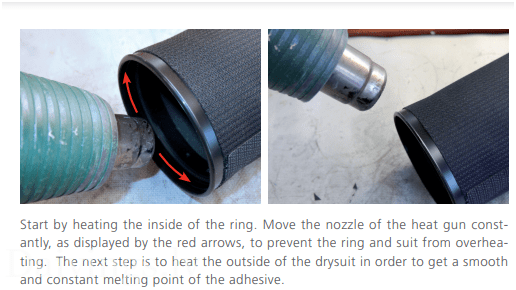
- Pressing:
- Using a pressure roller or similar tool, press the joints firmly to ensure a strong bond.
- Make sure all edges are tightly joined.
- Fixation:
- To ensure additional fixation, use adhesive tape to secure the joints.
- Allow the adhesive to dry completely according to the manufacturer's instructions (usually 24-48 hours).
- Inspection:
- After drying, check the watertightness of the connection.
- Place your hand inside the glove and check for leaks.
Important instructions:
- Always use the recommended polyurethane (PU) based adhesive.
- Work in a well-ventilated area to avoid inhaling glue fumes.
- Follow the manufacturer's instructions for using the adhesive and drying time.
- If in doubt, consult professional drysuit service specialists.
This guide provides general guidance. Always follow the recommendations of the manufacturers of specific drysuit products.

Of course, here are five popular questions and answers about drysuit gloves, as well as manufacturer recommendations:
1. Question: How to choose the right drysuit gloves?
- Answer:
- When choosing drysuit gloves, there are several factors to consider:
- Material: Neoprene gloves provide good thermal insulation, while latex or silicone gloves are more durable and provide better freedom of movement.
- Thickness: The thicker the gloves, the better the thermal insulation, but also the less freedom of movement.
- Size: Gloves should be snug, but not too tight, to ensure comfort and thermal insulation.
- Suit ring system compatibility: Make sure the gloves are compatible with your drysuit ring system (e.g. SI TECH).
- When choosing drysuit gloves, there are several factors to consider:
- Manufacturer recommendations:
- SI TECH recommends using gloves designed for use with their ring systems to ensure optimal seal and comfort.
2. Question: How to properly care for drysuit gloves?
- Answer:
- Rinse the gloves thoroughly with fresh water after each use to remove salt and other dirt.
- Allow the gloves to dry completely in the shade, avoiding direct sunlight.
- Store gloves in a cool, dry place.
- Regularly check your gloves for damage, such as cracks or holes.
- Manufacturer recommendations:
- SI TECH recommends using special neoprene or silicone care products to extend the life of the gloves.
3. Question: How to repair a hole in drysuit gloves?
- Answer:
- Small holes can be repaired using neoprene or latex glue.
- Larger holes may need to be patched with a special neoprene or latex patch.
- If the repair fails, it is recommended to contact a drysuit repair specialist.
- Manufacturer recommendations:
- SI TECH recommends using their polyurethane (PU)-based adhesive to ensure a strong and waterproof bond.
4. Question: How often should drysuit gloves be changed?
- Answer:
- The lifespan of gloves depends on the material, intensity of use and care.
- Gloves usually need to be replaced when they start to tear, lose elasticity, or no longer provide sufficient thermal insulation.
- Manufacturer recommendations:
- Manufacturers recommend checking the condition of the gloves before each dive.
5. Question: Can drysuit gloves be used in cold water?
- Answer:
- Yes, drysuit gloves are designed for use in cold water.
- However, it is important to choose gloves with sufficient thickness and thermal insulation to ensure comfort and warmth.
- Manufacturer recommendations:
- SI TECH manufactures products that are suitable for cold water, such as the Baltic Sea.

References related to the information presented in the article
- 74292000 Ultima Twist (160)
- 60251 PU Ring for QCS Oval (2×15)
- 60520 SI TECH Glove Lock QCP (120)
- Enluva Wool Liner (40)
- Drysuit Glove Ring Gluing Guide
- Diving equipment maintenance
Have a safe and warm dive!